When we bring companies on as LightBurn Vendors, we want to see them make it as straightforward and hassle-free as possible for their users to work with LightBurn. Below are some tips to make that process easier for you and your customers.
Vendor Bundles address a couple of requests that laser manufacturers have made of LightBurn since the beginning of time.
- How can we get our laser or logo on the devices list?
- How can we make our machines easier to set up in LightBurn?
Using Vendor Bundles allows machine manufacturers to build a custom package file that includes a large amount of custom information, relevant to their specific machine, including:
- Logos and Vendor Branding
- Contact and support information
- LightBurn device files for each machine the manufacturer supports
- Material libraries created and tuned by the manufacturer
- Camera Calibrations
- Galvo-specific configuration and calibration files
- more!
To be evaluated in the LightBurn Hardware Compatibility Matrix, you will be required to create a Vendor Bundle and make it accessible to your customers. We suggest hosting these on your support page, where you share information about configuring your machines in LightBurn.
Request Access to the Vendor Bundle tools
Vendor Bundles are for manufacturers that LightBurn has vetted internally. If you do not have access to this tool please email your company's R&D license key to Vendors@LightBurnSoftware.com.
We will enable the correct permissions on your key to allow you to access the tools.
Create a new Vendor Bundle
Vendors should generate a Vendor Bundle for any machine provided to customers that is compatible with LightBurn. This not only allows users to skip the new device process entirely, but also allows vendors to include everything the user needs in the configuration. Vendor Bundles can also package Material Libraries (libraries of premade cut settings, organized by material) that are linked to specific machines, creating a low difficulty start up experience for users.
Please follow the steps below to make sure you have included everything necessary, then create the Vendor Bundle. Note that if a machine has different configurations, you must provide a separate bundle for each configuration, or package a separate device profile for each configuration into a single bundle.
Initial Device Setup
Follow the instructions here to add your device to LightBurn: https://docs.lightburnsoftware.com/latest/GetStarted/FindMyLaser/
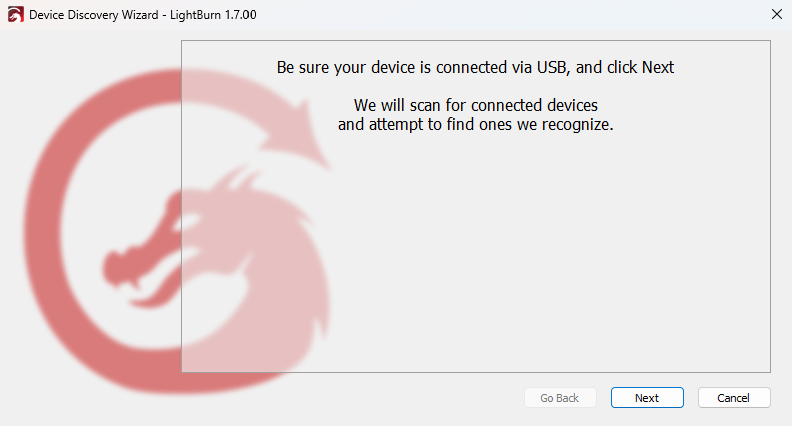
This will get you the basic device configuration to start with. Be sure to follow the new device wizard flow and set up the configuration options it provides, such as name, size, and origin.
If your device is connected via network only, use the Create Manually option, and enter an IP address that works locally. The user will have to change it later, regardless. As the vendor, please provide proper documentation to the user that they must change the IP settings themselves and how.
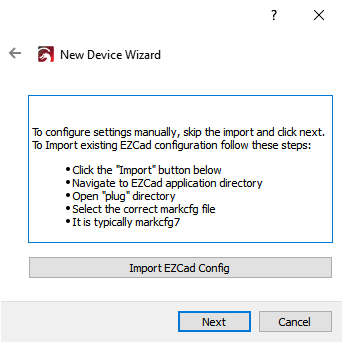
EZCad / BSL / Galvo Devices
This process is also available for EZCad and BSL based galvo engravers. The Device Wizard provides an option to import an EZCad markcfg7 file that should import everything necessary, or you can directly configure everything in LightBurn.
See this page for more information:
https://docs.lightburnsoftware.com/latest/GetStarted/AddGalvo/
LightBurn treats different lenses on the same Galvo system as distinctly different devices, so you will need to provide your users with a separate Vendor Bundle for each lens, or a single Vendor Bundle containing separate device profiles for each lens.
Creating distinct bundles or profiles for each lens means that the lens scale, bulge, skew, and trapezoid parameters can be preconfigured.
.Corfile data for EzCAD2 devices is exported with bundles, so this can also be useful for pre-configured machines.
Further Device Setup
With the new device selected, open the Device Settings window: https://docs.lightburnsoftware.com/latest/Reference/DeviceSettings/
Update any of the advanced settings in this window as required by the device, and then test to ensure they work correctly.
GCode Macro Buttons
If the device is GCode-based, you can provide pre-defined GCode macros in the Macros Window: https://docs.lightburnsoftware.com/latest/Reference/MacrosWindow/
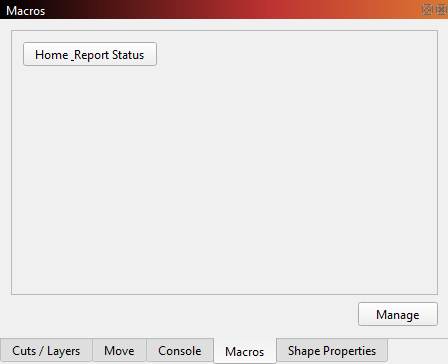
Macros can be very helpful for the user, especially if the device has features that do not have a direct option in the LightBurn UI. For example, some lasers have secondary home positions, or macros to control the Z Axis for different material thicknesses.
Camera Lens Calibration
If the device includes a built-in camera we highly recommend providing the lens calibration in the device profile provided to the customer: https://docs.lightburnsoftware.com/latest/Reference/CalibrateCameraLens/
By providing the lens calibration in the device profile, the user can skip that step and get their camera working quickly.
Please note: this does NOT include camera alignment — only the lens correction — as alignment is best performed after a machine has been unboxed and set up. Take care to note this fact to the user in the provided documentation.
Scanning Offset Adjustment
While it may be better to configure this option after the customer has already set up the machine, some machines are perfectly capable of maintaining their mechanical characteristics through the shipping process. This must be evaluated by the vendor as to what works best for their specific machine.
One option is to calibrate the scanning offset adjustment per machine, and provide a specific device profile to each user from the factory. The rigidity of the laser and the mass of the cutting head will affect this calibration, so calibrations may be needed for each different diode head offered with a particular laser system
Follow the directions here: https://docs.lightburnsoftware.com/latest/Guides/ScanningOffsetAdjustment/
Material Libraries
We highly recommend providing a pre-configured Material Library for each device and laser source combination. For example, if you have 2 different machines, each with 3 different laser power level options, then 6 separate Material Library files should be provided — one for each combination of machine type and laser power. As the vendor it is up to you to make sure these libraries are accurate and will provide a reliable experience for your users.
Vendor Bundles are able to package device profiles with device-specific libraries pre-linked for the user.
Please follow the documentation for how to create, edit, and, if needed, export a material library: https://docs.lightburnsoftware.com/latest/Reference/MaterialLibrary/
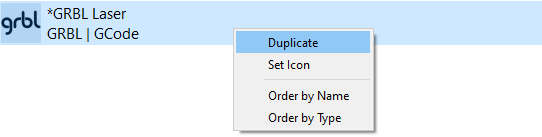
Change the Device Icon to Your Logo
If you would like to brand your machines Device Entry with your logo open up the Devices window and follow these steps:
- Right-click on the Device entry.
- Click Set Icon
- Select a .PNG icon file that is 1024x1024px or smaller
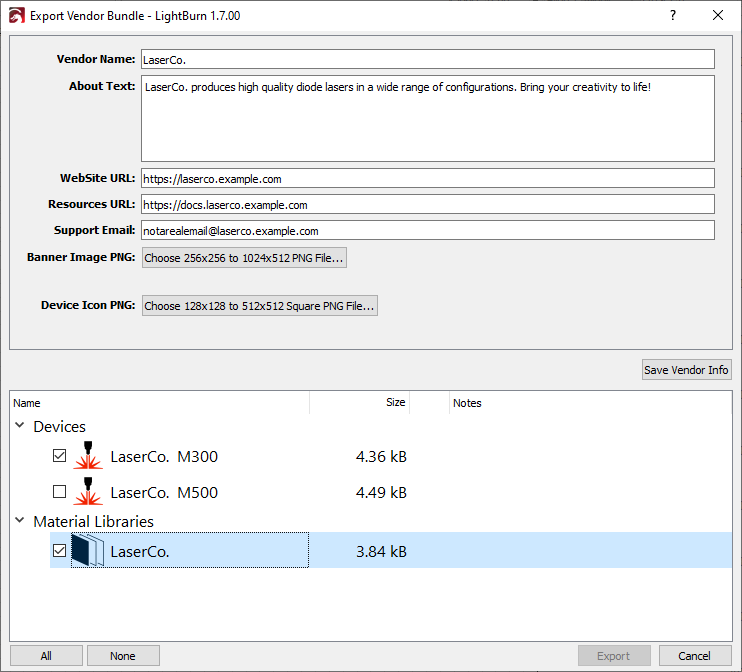
Exporting the Vendor Bundle
Finally, you can export a Vendor Bundle by going to the File Menu, hovering over Bundles to open a dropdown menu, and selecting Export Vendor Bundle. If you do not see this option, the license you are using is not tagged as "Vendor" — reach out to us at Vendors@LightBurnSoftware.com to have that added.
In the Vendor Bundle dialog, you can select which machine or machines you would like to include, and whether or not a Material Library is linked to the Machine Profile, and then Export it. Name the bundle something that makes sense for what is included, and then provide this file directly to the customer, or publicly on your website.
For more information on Vendor Bundles see our documentation here: Vendor Bundles.